 shivani singh
- November 10, 2021
7 Steps to Setup Asterisk on Ubuntu 20.04 LTS
Asterisk is a free & open-source telephone solution. It is used for individuals, businesses, and governments & runs over the Internet instead of copper phone lines. It is used for voicemail, call recording, interactive voice response, and conference calling.
There are few steps to install Asterisk on ubuntu:
Step 1: Update the System.
apt-get update
Step 2: Install the Required Dependencies.
apt-get install unzip git gnupg2 curl libnewt-dev libssl-dev libncurses5-dev subversion libsqlite3-dev build-essential libjansson-dev libxml2-dev uuid-dev subversion
- Here is the output.
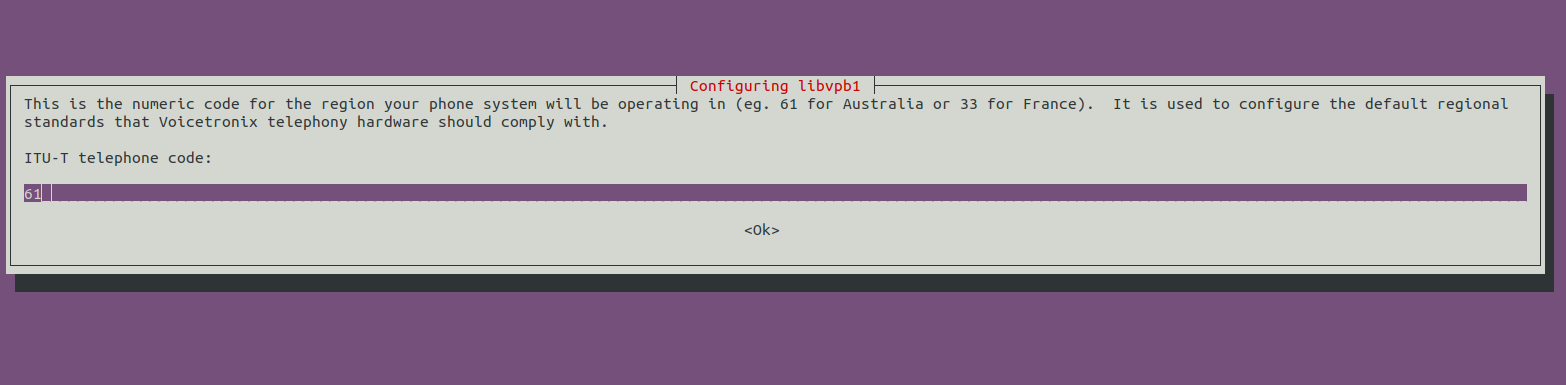
- Configure libvpd1,select ITU-T telephone code: 61 for Australia.Click on Ok.
Step 3: Download the Asterisk.
wget http://downloads.asterisk.org/pub/telephony/asterisk/asterisk-17-current.tar.gz
- Here is the command output.
root@ip-172-31-22-134:/home/ubuntu# wget http://downloads.asterisk.org/pub/telephony/asterisk/asterisk-17-current.tar.gz

--2021-11-01 11:39:06-- http://downloads.asterisk.org/pub/telephony/asterisk/asterisk-17-current.tar.gz

Resolving downloads.asterisk.org (downloads.asterisk.org)... 170.249.154.172

Connecting to downloads.asterisk.org (downloads.asterisk.org)|170.249.154.172|:80... connected.

HTTP request sent, awaiting response... 200 OK

Length: 43499686 (41M) [application/x-gzip]

Saving to: ‘asterisk-17-current.tar.gz’

asterisk-17-current.tar.gz 100%[===========================================================================================>] 41.48M 9.97MB/s in 12s

2021-11-01 11:39:19 (3.37 MB/s) - ‘asterisk-17-current.tar.gz’ saved [43499686/43499686]
- Extract the downloaded folder.
tar zxf asterisk-17-current.tar.gz
- Change the directory & Run the following commands to install required packages.
cd asterisk-17.*/

contrib/scripts/get_mp3_source.sh

contrib/scripts/install_prereq install
- Here is the command output.
root@ip-172-31-22-134:/home/ubuntu# tar zxf asterisk-17-current.tar.gz

root@ip-172-31-22-134:/home/ubuntu# cd asterisk-17.*/

root@ip-172-31-22-134:/home/ubuntu/asterisk-17.9.4# contrib/scripts/get_mp3_source.sh

A addons/mp3

A addons/mp3/Makefile

A addons/mp3/README

A addons/mp3/decode_i386.c

A addons/mp3/dct64_i386.c

A addons/mp3/MPGLIB_TODO

A addons/mp3/mpg123.h

A addons/mp3/layer3.c

A addons/mp3/mpglib.h

A addons/mp3/decode_ntom.c

A addons/mp3/interface.c

A addons/mp3/MPGLIB_README

A addons/mp3/common.c

A addons/mp3/huffman.h

A addons/mp3/tabinit.c

Exported revision 202.

root@ip-172-31-22-134:/home/ubuntu/asterisk-17.9.4# contrib/scripts/install_prereq install

Reading package lists... Done

Building dependency tree

Reading state information... Done

The following additional packages will be installed:

aptitude-common libboost-iostreams1.71.0 libcgi-fast-perl libcgi-pm-perl libclass-accessor-perl libcwidget4 libencode-locale-perl libfcgi-perl libhtml-parser-perl

libhtml-tagset-perl libhttp-date-perl libhttp-message-perl libio-html-perl libio-string-perl liblwp-mediatypes-perl libparse-debianchangelog-perl libsigc++-2.0-0v5

libsub-name-perl libtimedate-perl liburi-perl libxapian30

Suggested packages:

aptitude-doc-en | aptitude-doc apt-xapian-index debtags tasksel libcwidget-dev libdata-dump-perl libhtml-template-perl libxml-simple-perl libwww-perl xapian-tools

The following NEW packages will be installed:

aptitude aptitude-common libboost-iostreams1.71.0 libcgi-fast-perl libcgi-pm-perl libclass-accessor-perl libcwidget4 libencode-locale-perl libfcgi-perl libhtml-parser-perl

libhtml-tagset-perl libhttp-date-perl libhttp-message-perl libio-html-perl libio-string-perl liblwp-mediatypes-perl libparse-debianchangelog-perl libsigc++-2.0-0v5

libsub-name-perl libtimedate-perl liburi-perl libxapian30

0 upgraded, 22 newly installed, 0 to remove and 113 not upgraded.

Need to get 4916 kB of archives.

After this operation, 23.2 MB of additional disk space will be used.

Get:1 http://sa-east-1.ec2.archive.ubuntu.com/ubuntu focal/universe amd64 aptitude-common all 0.8.12-1ubuntu4 [1711 kB]

Get:2 http://sa-east-1.ec2.archive.ubuntu.com/ubuntu focal/main amd64 libboost-iostreams1.71.0 amd64 1.71.0-6ubuntu6 [237 kB]

Get:3 http://sa-east-1.ec2.archive.ubuntu.com/ubuntu focal/main amd64 libsigc++-2.0-0v5 amd64 2.10.2-1build1 [11.7 kB]

Get:4 http://sa-east-1.ec2.archive.ubuntu.com/ubuntu focal/universe amd64 libcwidget4 amd64 0.5.18-5build1 [306 kB]

Get:5 http://sa-east-1.ec2.archive.ubuntu.com/ubuntu focal/universe amd64 libxapian30 amd64 1.4.14-2 [661 kB]
Step 4: To configure Asterisk.Run the command:
./configure
- To setup the menu options.
make menuselect
- Here is the command output.
- To use Arrow key to navigate and Enter key to select.
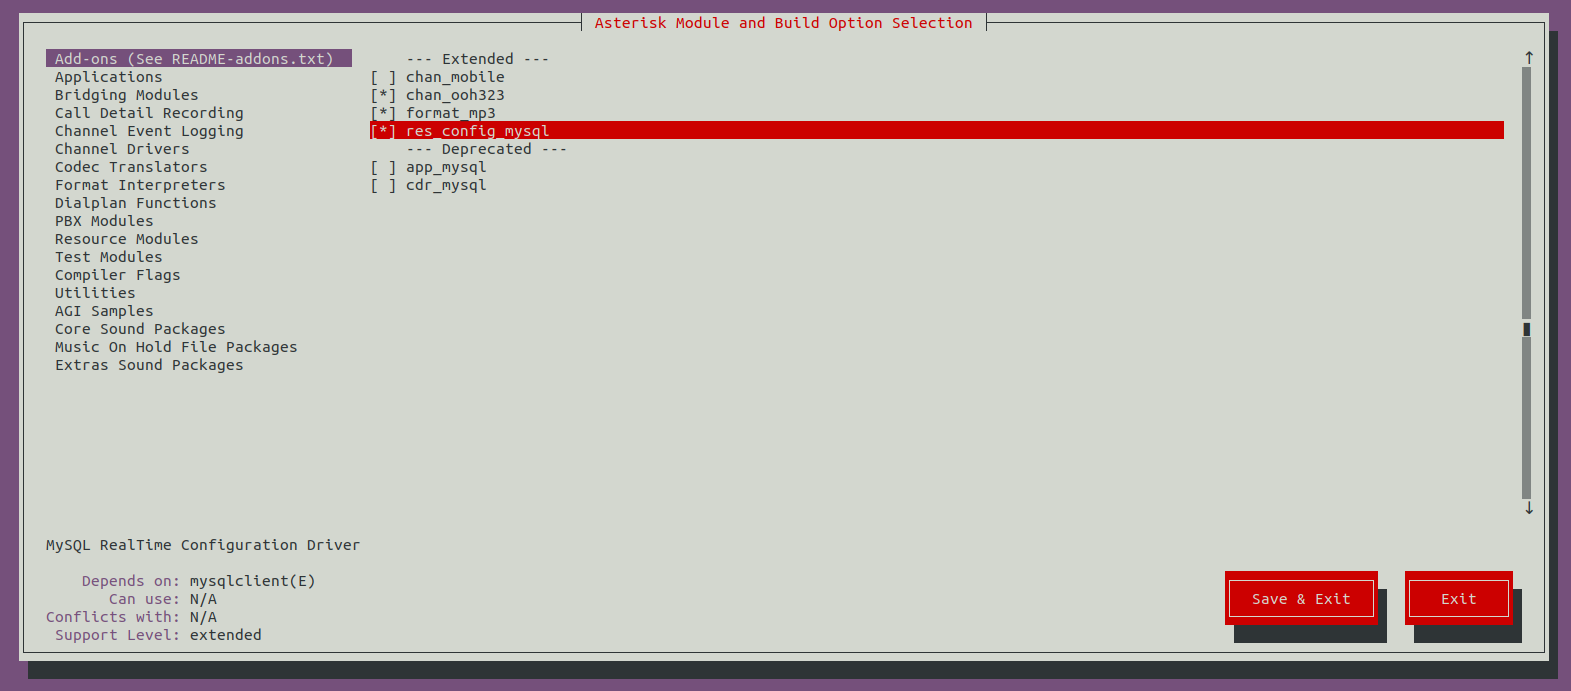
- To Enable require add-ons.Select the Following modules.
- To Enable Core Sound Packages.

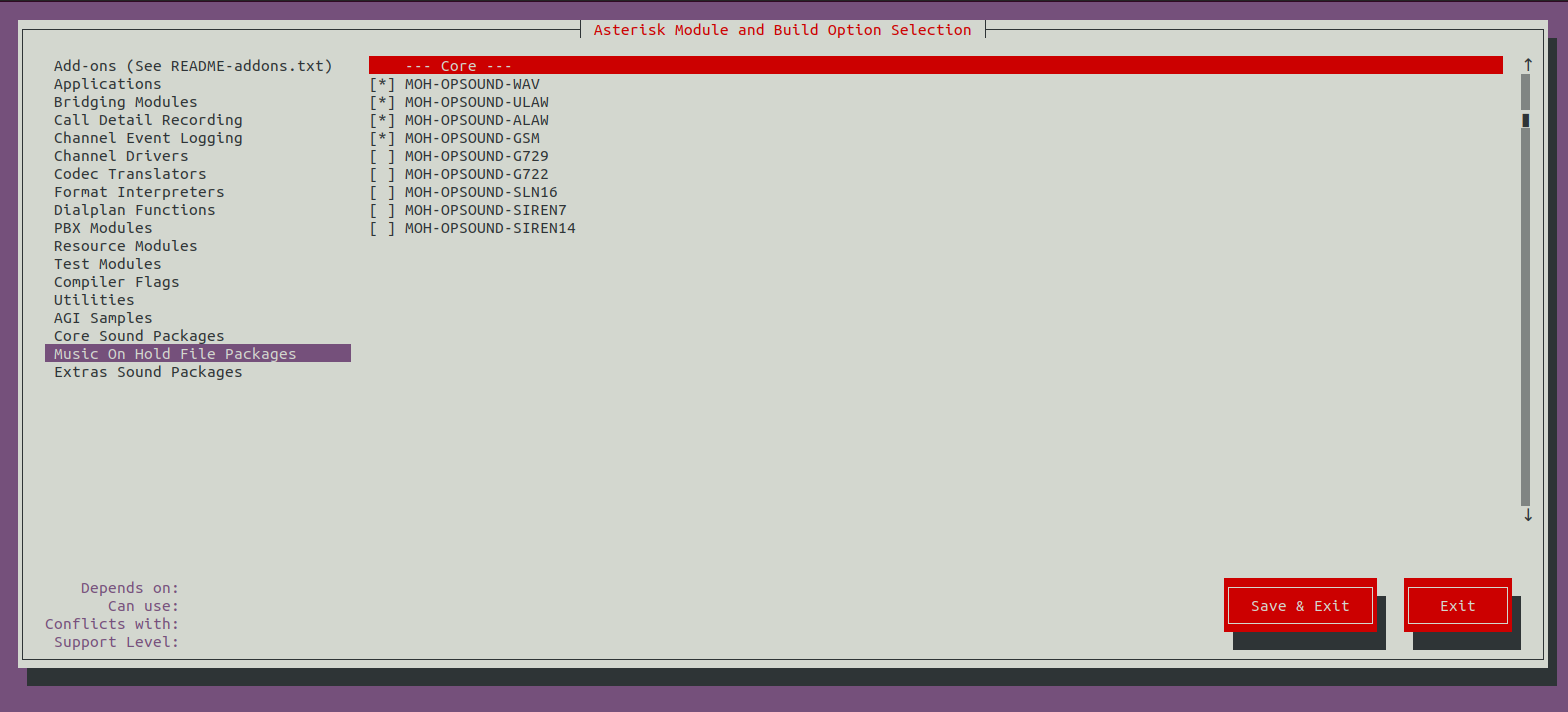
- To Enable Music on Hold file Packages.
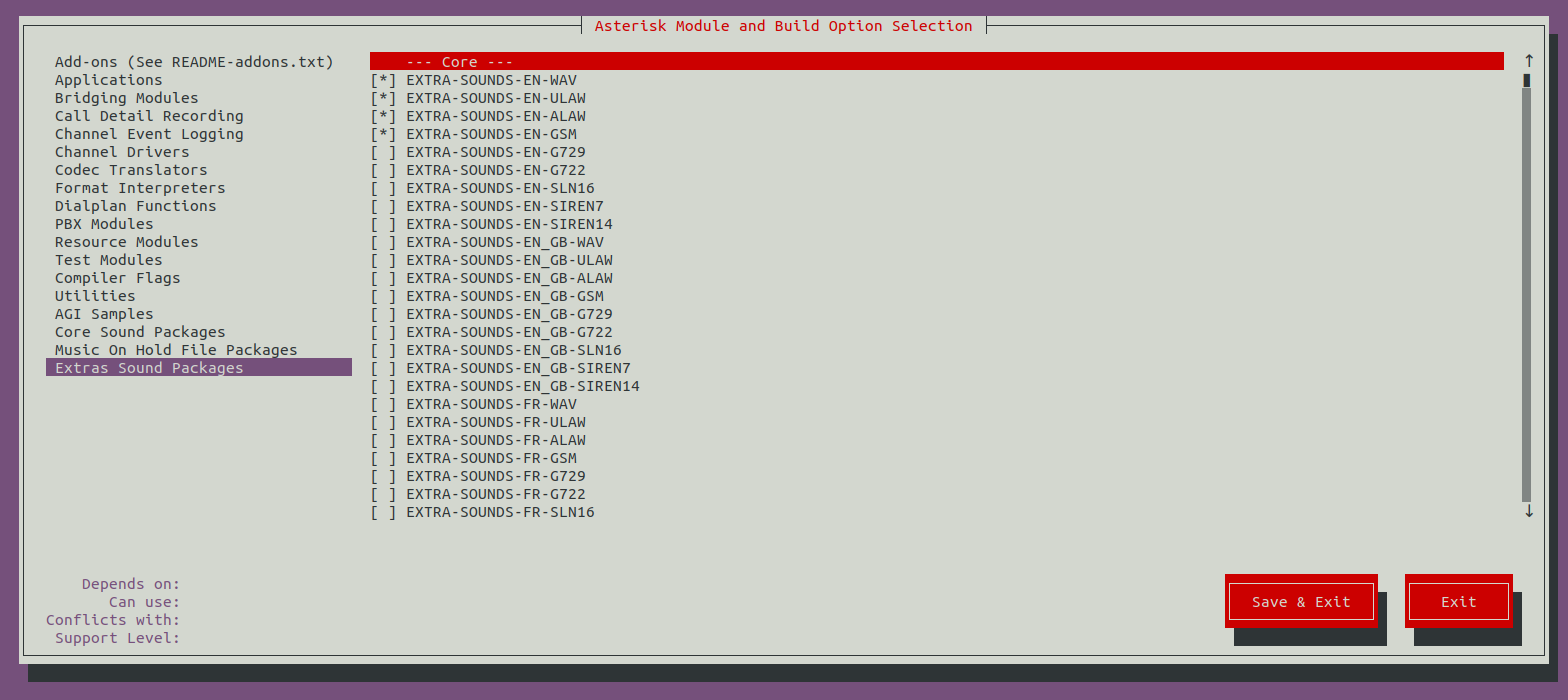
- To Enable Extras Sound Packages.
- Select Save & Exit.
- To build & install Asterisk.
make -j2

make install
- To install configs and samples.
make samples

make config

ldconfig
Step 5: To create a user and group for Asterisk.
groupadd asterisk

useradd -r -d /var/lib/asterisk -g asterisk asterisk
- To add required users to the Asterisk group.
usermod -aG audio,dialout asterisk
- Provide the following permission.
chown -R asterisk.asterisk /etc/asterisk

chown -R asterisk.asterisk /var/{lib,log,spool}/asterisk

chown -R asterisk.asterisk /usr/lib/asterisk
Step 6: Configure the asterisk file.
vim /etc/default/asterisk
- Uncomment the following values:
AST_USER="asterisk"

AST_GROUP="asterisk"
- Here is the command output.
# Uncomment the following and set them to the user/groups that you

# want to run Asterisk as. NOTE: this requires substantial work to

# be sure that Asterisk's environment has permission to write the

# files required for its operation, including logs, its comm

# socket, the asterisk database, etc.

AST_USER="asterisk"

AST_GROUP="asterisk"
- Open the Asterisk default configuration file.
vim /etc/asterisk/asterisk.conf
- Uncomment the following values:
runuser = asterisk ; The user to run as.

rungroup = asterisk ; The group to run as.
- Here is the command output.
;transcode_via_sln = yes ; Build transcode paths via SLINEAR, instead of

; directly.

runuser = asterisk ; The user to run as.

rungroup = asterisk ; The group to run as.
- Restart and enable the Asterisk service.
systemctl restart asterisk

systemctl enable asterisk
- Check the Asterisk status.
systemctl status asterisk
- Run the following command,when we gets the following error.
radcli: rc_read_config: rc_read_config: can't open /etc/radiusclient-ng/radiusclient.conf: No such file or directory
- Run the commands:
sed -i 's";\[radius\]"\[radius\]"g' /etc/asterisk/cdr.conf

sed -i 's";radiuscfg => /usr/local/etc/radiusclient-ng/radiusclient.conf"radiuscfg =>

/etc/radcli/radiusclient.conf"g' /etc/asterisk/cdr.conf

sed -i 's";radiuscfg => /usr/local/etc/radiusclient-ng/radiusclient.conf"radiuscfg =>

/etc/radcli/radiusclient.conf"g' /etc/asterisk/cel.conf
- Again start the Asterisk service.
systemctl start asterisk
Step 7: Connect to the Asterisk.
asterisk -rvv
- Here is the command output.
root@ip-172-31-22-134:/home/ubuntu/asterisk-17.9.4# asterisk -rvv

Asterisk 17.9.4, Copyright (C) 1999 - 2018, Digium, Inc. and others.

Created by Mark Spencer <markster@digium.com>

Asterisk comes with ABSOLUTELY NO WARRANTY; type 'core show warranty' for details.

This is free software, with components licensed under the GNU General Public

License version 2 and other licenses; you are welcome to redistribute it under

certain conditions. Type 'core show license' for details.

=========================================================================

Please note that this version of Asterisk no longer receives bug fixes.

Consult the following URL for Asterisk version support status information:

https://wiki.asterisk.org/wiki/display/AST/Asterisk+Versions

=========================================================================

Running as user 'asterisk'

Running under group 'asterisk'

Connected to Asterisk 17.9.4 currently running on ip-172-31-22-134 (pid = 46709)

ip-172-31-22-134*CLI>
- Run Exit command.
Exit