shivani singh
- February 2, 2022
Steps to Install & Configure Flask on Ubuntu 20.04 LTS
Flask is an open source micro web-based python framework. It helps users to build secure, scalable and maintainable web applications. It provides tools, libraries and technologies that allow to build a application.
Prerequisites:
- Ubuntu system with Sudo privileges.
There are some steps to setup Flask on Ubuntu:
Step 1: Update the System.
apt-get update
Step 2: No need to install python in Ubuntu 20.04.So Check python version.
python3 -V
- Here is the command output.
root@ip-172-31-31-201:/home/ubuntu# python3 -V

Python 3.8.10
- Install the required packages.
apt install build-essential python3-pip libffi-dev python3-dev python3-setuptools libssl-dev

apt install python3-venv
Step 3: Now, Setup a Environment.
- Create a directory & navigate into it.
mkdir test_flask_app

cd test_flask_app
- Create a environment.
python3 -m venv venv
- To start the created environment.
source venv/bin/activate
- Here is the command output.
root@ip-172-31-31-201:/home/ubuntu# mkdir test_flask_app

root@ip-172-31-31-201:/home/ubuntu# cd test_flask_app

root@ip-172-31-31-201:/home/ubuntu/test_flask_app# python3 -m venv venv

root@ip-172-31-31-201:/home/ubuntu/test_flask_app# source venv/bin/activate

(venv) root@ip-172-31-31-201:/home/ubuntu/test_flask_app#
Step 4: Install Flask using pip3 on system.
pip3 install flask
- Here is the command output.
(venv) root@ip-172-31-31-201:/home/ubuntu/test_flask_app# pip3 install flask

Collecting flask

Downloading Flask-2.0.2-py3-none-any.whl (95 kB)

|████████████████████████████████| 95 kB 5.6 MB/s

Collecting click>=7.1.2

Downloading click-8.0.3-py3-none-any.whl (97 kB)

|████████████████████████████████| 97 kB 10.3 MB/s

Collecting Jinja2>=3.0

Downloading Jinja2-3.0.3-py3-none-any.whl (133 kB)

|████████████████████████████████| 133 kB 68.3 MB/s

Collecting Werkzeug>=2.0

Downloading Werkzeug-2.0.2-py3-none-any.whl (288 kB)

|████████████████████████████████| 288 kB 67.1 MB/s

Collecting itsdangerous>=2.0

Downloading itsdangerous-2.0.1-py3-none-any.whl (18 kB)

Collecting MarkupSafe>=2.0

Downloading MarkupSafe-2.0.1-cp38-cp38-manylinux2010_x86_64.whl (30 kB)

Installing collected packages: click, MarkupSafe, Jinja2, Werkzeug, itsdangerous, flask

Successfully installed Jinja2-3.0.3 MarkupSafe-2.0.1 Werkzeug-2.0.2 click-8.0.3 flask-2.0.2 itsdangerous-2.0.1

(venv) root@ip-172-31-31-201:/home/ubuntu/test_flask_app#
- Check flask version.
flask --version

or

python -m flask --version
- Here is the command output.
(venv) root@ip-172-31-31-201:/home/ubuntu/test_flask_app# flask --version

Python 3.8.10

Flask 2.0.2

Werkzeug 2.0.2
Step 5: Create a Minimal Application.
- Create a file.
example.py
- Add the following line:
from flask import Flask

app = Flask(__name__)

@app.route('/')

def hello_world():

return 'Hello World!'

if __name__ == "__main__":

app.run(host='0.0.0.0')
- Open the following port number in UFW firewall.
ufw allow 5000
- Here is the command output.
(venv) root@ip-172-31-31-201:/home/ubuntu/test_flask_app# ufw allow 5000

Rules updated

Rules updated (v6)
- Run the created file.
python example.py
- Here is the command output.
(venv) root@ip-172-31-31-201:/home/ubuntu/test_flask_app# python example.py

* Serving Flask app 'example' (lazy loading)

* Environment: production

WARNING: This is a development server. Do not use it in a production deployment.

Use a production WSGI server instead.

* Debug mode: off

* Running on all addresses.

WARNING: This is a development server. Do not use it in a production deployment.

* Running on http://172.31.31.201:5000/ (Press CTRL+C to quit)

132.154.114.192 - - [02/Feb/2022 08:12:25] "GET / HTTP/1.1" 200 -

132.154.114.192 - - [02/Feb/2022 08:12:28] "GET / HTTP/1.1" 200 -
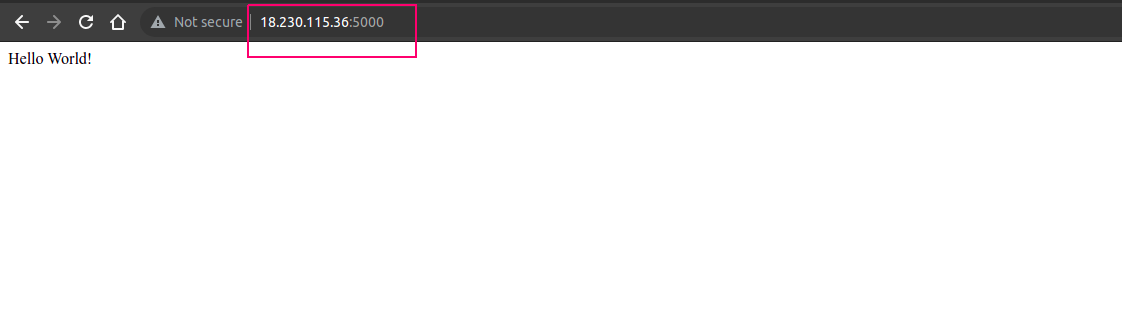
Step 6: Open the Application using URL.
http://server-ip:5000
- Here is the output.